Thursday, June 24, 2010

Cleaver Crafty Cheap does a baby "Sprinkle"

When I found out that my good friend from elementary school was expecting number two! I jumped at the chance to host a cleaver, crafty, and cheap "Sprinkle" in her honor. Even though I would spend thousands if I could the truth is times are tight but thats no reason not to have any fun!

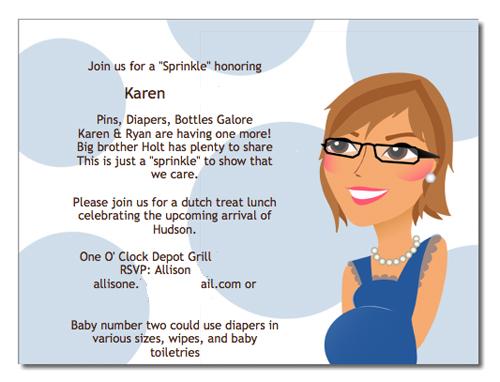
Here's my one splurge. I found this adorable website where you can make carton images in your likeness. When I was done with the invite it looked EXACTLY like my friend Karen. I even tested it on her three year old and he said "That looks like my mommy." (If your wondering why it looks wonky it's because I removed personal info) I splurged a bit on these because I was totally in love with them. These cost about $30.00 . In this case the clever out weighed the cheap side of me.


Karen's a big rubber ducky fan so I went with a yellow/teal color scheme (I did not choose the table cloth color) with rubber ducks. The center pieces were made with round candle holders from the dollar store, rubber ducks, marbles from the dollar store, and scrapbook paper cut into various sized circles for the confetti. The overall price for the center pieces was about $8.00. Cheap!


I really wanted something with a duck on the top of the cupcakes but believe it or not that was hard to find. Well, hard to find for a price I was willing to pay. Time to get crafty! These were made using cardstock, a rubber stamp, markers, and coffee stirrers. The best part is a friend of mine let me borrow all the scrapbooking supplies so I only was out the cost of paper, stirrers, and a $1.oo duck stamp. Since my friend Karen can not have gluten I had to get clever with the cupcakes. I made two kinds with and without gluten. I marked the gluten free with a dark teal topper. Then I added little teal sprinkles give the feeling of bubbles. Making cupcakes beats the price of buying them any day. The icing was actually quite easy to make and piping on with a large star tip makes them look straight from a bakery.


To display the cupcakes I borrowed two of my mom's cake plates. (Borrowed=free yay) The varying heights made a great display in the window. I scattered some more of my hand made confetti
underneath for more colorful fun!


Finally the favors! I made these adorable candies using a candy mold and candy melts. It was really easy. I had done some searching online for duck related favors but as usual I couldn't find anything for a price I was willing to pay. The hardest part about making the candies was keeping my husband from eating them all!


Although I knew the baby was going to be a boy, I think these colors/theme could easily be used for a gender neutral shower. Throw in some pink and it would also be perfect for a little girl! Hosting this shower was so much fun and it's always great to make someone you care about smile!

Monday, February 8, 2010

Long Time No See...half bath redo!

Finally a post!!! Yeah, sorry I suck I will try to do better I promise! But enough with the the begging for forgiveness for being a bad bad blogger....on to the half bath!

Why is it that I always manage to forget the before picture... ugh so disappointing. This one came from my phone it's not very good quality but you can get an idea about how dark and cave like this little bathroom was. Not to mention the horrible vanity and striped wall paper yuck!


And here is the after. Ta da!


Breaking it down where did it come from how much did it cost?:

Mirror: thrift store find 3$ primed and painted white
Sink: 50$ Lowe's The pedestal really freed up some space in this tiny room.
Faucet: 32$ Lowe's
Lights: Unsure of the price but again they are from Lowe's. The globes are hard to see in the picture but they are clear with bubbles. I though this went well with the watery feel of the room.
Tile: hmm I don't remember less that 1$ a square foot from Lowe's
Basket shelf: free! My grandmother didn't want it anymore so I spray painted the metal part white and it fit perfectly!
Paint: color is Benjamin Moore, Pool Blue. I got a lot of crap for the brightness of this color but it's such a tiny room why not! I love it and that's all that matters.
Floating shelves: Target
Towel Holder: Target clearance $3.50
Toilet Paper Holder: Ikea
Other: The picture was my inspiration for the color of the room. I got this at a festival for 12$. The small white koi on the shelf is actually a salt and pepper shaker from Target. I really wanted a little white koi and it was perfect! No one has to know he belongs in the kitchen. The orange reed diffuser was DIY (vase+ liquid potpourri+ skewers). The night-light air freshener was a gift from a friend. It's a Scentsy, the white ceramic was just perfect for this room.


So there you have it! I can go into details about the demolition and the layers and layers of old flooring we removed but that's the boring stuff. If you have any questions about anything or your wondering how we tiled, painted, stripped wall paper, etc comment below and I will see if I can answer your question.

Here are some pictures of the process:

Here is DH tiling:And here he is mixing grout:
And here I am grouting tile:


Hope you enjoyed this post!

Tuesday, October 6, 2009

DIY Retro Coasters


I found these white, glossy porcelain tiles in the shed when we moved into our house. A whole entire box of them! So naturally I began brainstorming what I could make out of them. I saw some decopodge coasters somewhere in my endless blog stalking... and DH and I are known for our strict coaster policy..you can never have enough coasters so I decided that would be a great project.


First I put a thin coat of decoupage medium on the tile.


Then I covered it with things that I had cut out of an old dictionary. This one is for my future sister-in-law so I put an M for her name, the definition of her name, and then all the pictures start with the letter M. I also made some coasters from an old cook book.

After covering the tile I put 4 or 5 thin coats of the medium on top. Then I used very fine sand paper to smooth out the top once it had dried. I found felt circle stickers at Lowes that worked great for putting on the back of the tile.


Ta Da! So cute coasters here is the cost break down:
Tile: Free
Decoupage medium: $3.79
Felt circles: $.99
Cook Book and Dictionary from a thrift store: $2.00
Total Cost: $6.78

Wednesday, August 12, 2009

Yay I was featured!

I was featured on DIY Show Off go see...

Monday, August 10, 2009

It's a Jungle Out There!

So the flowerbed had become a bit of a jungle this summer. Yeah... this picture is a bit embarrassing. When we purchased the house we inherited lots of plants that we had no idea what to do with! : ) I cringe at the thought that the former owner might ride by to see what we have done with the place and fall over dead!


Unfortunately a lot of these wonderful plants have been here for some time and have become intertwined, overgrown, and some are trying desperately to escape the perimeter of the flowerbed.

Most of the green you are seeing to the left of the bunny are weeds or Japanese lanterns. I decided the lanterns, as neat as they are, were looking more like weeds and growing crazy across the whole flower bed so they had to go. I also had gotten tired of letting the irises, lilies, and daffodils soak up the sun for next spring so I went ahead and cut them off as well. I was nice enough to leave the peony (for now) that will get trimmed back in the fall. I also trimmed the boxwood and raked some of the mulch out to make room for more later.

I may call myself clever, and crafty but I am not either of these in the yard/garden. I am trying and learning and hopefully one day I will catch on. I am however, cheap by doing it all myself and moving/re purposing as many plants as possible.

So here is the end result of a long, hot, day working in the flower bed. The boxwood looks a little patchy because some large parts of it were actually growing separately from the ground. I removed those so that the main bush could fill out more.

What is in store for the future of our flower bed? Short term: get rid of the red mulch and replace it with brown. I also want to plant some low maintenance plants and attempt to move some of the bulbs around. My gladiolas and irises fell over and need to be planted deeper.

Long term goals: I would like to replace the scalloped brick edging with something more updated. Mr. Bunny you are cute but you've gotta go! I am working on growing new sage and rosemary from cuttings from the current plants so I can dig up the old ones and move/replant the new ones. The sage is actually hanging out of the bed and the rosemary has roots as thick as a small tree.

As for the rest of the front yard we also plan to plant grass where the azaleas used to be and maybe line the walk with some liriope once the weather is cooler.

So stay tuned for future updates and pictures showing improvements to the front yard.

Thursday, August 6, 2009

Fabulous Freebies

Check out this great blog and enter to win one on her many giveaways including a cordless hair straightener so cool!

Sunday, August 2, 2009

Thrift Store Find Redesign: Dresser Tray


Finally....my pics of the dresser tray are loaded and ready to go. I picked up this old plaque at The Love of Jesus for $1.00! I think the guy at the counter thought I had lost my mind for buying it and decided to give me a bargin. Anyway, this is what it looked like when I bought it....apparently someone took the important part and gave the rest away. : ) It's thick and heavy so it should stand the test of time.


After pulling the felt and metal plate off I primed the plaque using Kilz 2. Then I painted it using Benjamin Moore Super Spec semi gloss white. (both the Kilz and white paint I had left over from painting trim) After painting I hemed a piece of fabric I had left over from a previous project to fit inside the frame. I measured the inside of the plaque and had a piece of glass cut to fit at Lowes. So here's the low down on the cost of this project:


Plaque: $1.00


Paint and Primer: Free


Fabric: Free


Glass: $3.49


That makes a grand total of just $4.49! So there you have it this beautiful tray to hold my perfume and whatnot on my dresser for less than $5.00!


Here's the finished project: